Have You Met FRED?
Have you met FRED? If you haven't, you are about to when you read this article. FRED is not a person, but a thing. It's a service provided by your tax dollars that helps you learn about various components of the economy. It is created and maintained by the Federal Reserve of the United States.
This tutorial will show you how to set FRED up using a plugin in Excel. Then, it will show you the basics of how to explore the data.
There are several data points, which makes it impossible to cover in one tutorial. However, you'll have a solid foundation to get you started.
FRED Is an Acronym
FRED is an acronym for:
(F)ederal (R)eserve (E)conomic (D)ata.
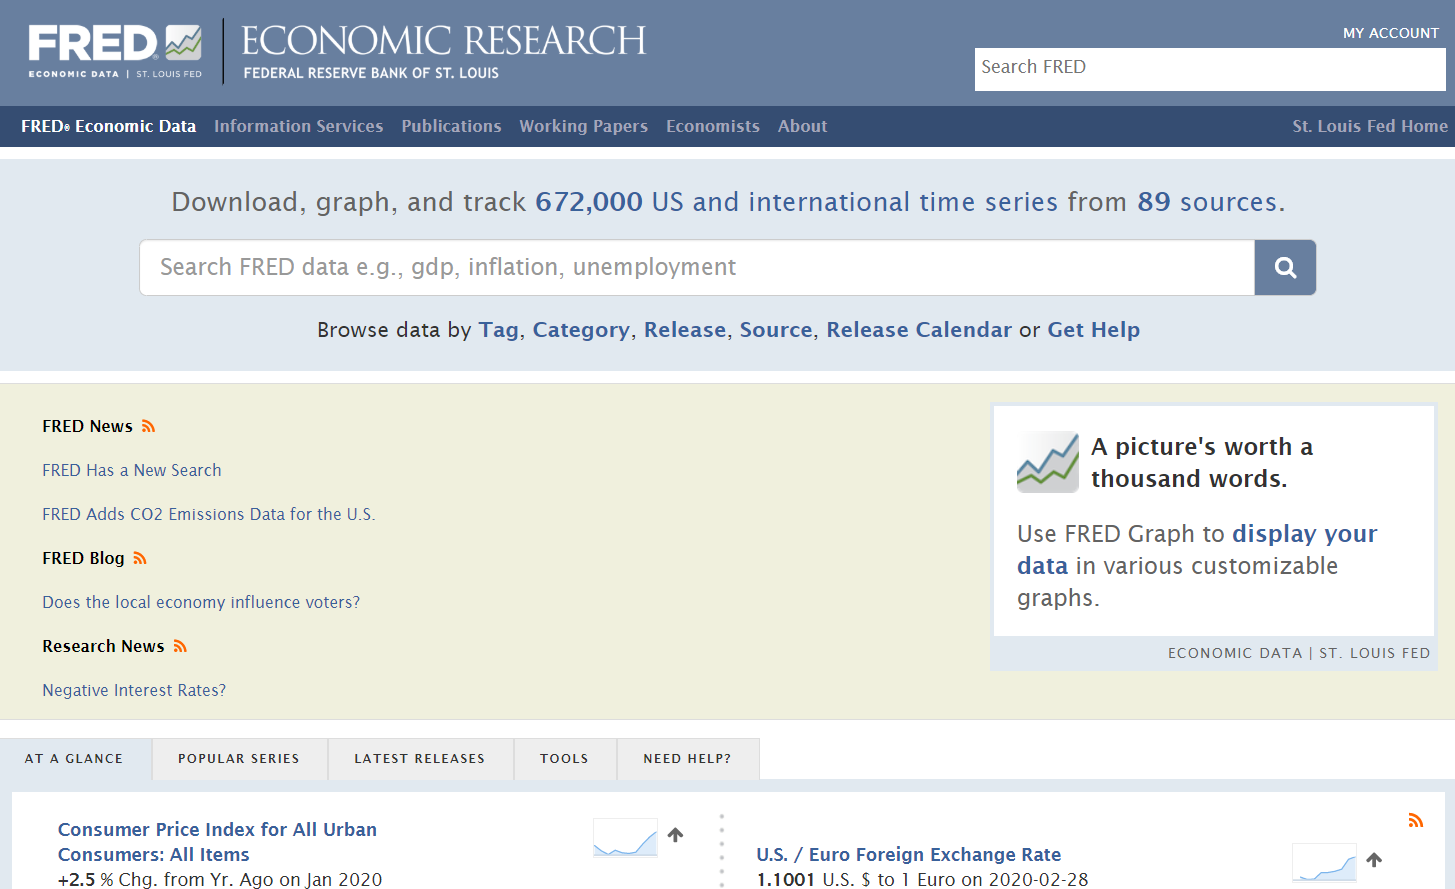
Access to the website will give you several data points.
Tutorial
Feel free to explore the FRED website. This tutorial will give you the knowledge you need to install a Microsoft Excel addin from the FRED website and show you the basics on downloading data. It's not a full-blown tutorial on how to use the FRED database, although I will go over basic functionality. I will also include resources of other tutorials to help you learn more about this extensive database.
The Value Added with This Tutorial
Installing the FRED add-in is relatively easy. However, people sometimes are not sure what to do with it once they install it. This tutorial takes the installation one step further by showing you the basics of how it's used.
Also, when installing the add-in, the instructions from the Federal Reserve do not specify to place it in a trusted folder. If you don't do this, each time you start Excel, you'll need to uncheck and check the FRED add-in. This tutorial shows you how to make the add-in trusted. You won't have to refresh the add-in each time you run Excel.
Download the AddIn from FRED
I have included the link for you to download the addin from the Federal Reserve database. Keep in mind that links are subject to change (often, actually), so if it doesn't work, search on Google (or your favorite search engine) for the following:
FRED Database Excel Addin
Federal Reserve Database Excel Addin
Both of those should work. The video on the FRED website doesn't seem to show you how to install the addin (at the time of this writing). Therefore, I have included the installation instructions.
Step 1 - Download the Addin
Link: https://fred.stlouisfed.org/fred-addin/
When saving this link, take note of where you saved it.
Note: Microsoft has tightened up security in recent years. If you want any add in to appear each time you start Excel, you'll want to put the downloaded add-in in a trusted folder. Otherwise, you'll have to re-enable the add in every time.
This gets a bit tricky because your version of Excel (or Office for that matter) may be different than mine. I will list my directory for reference, but you may have to make adjustments:
C:\Program Files\Microsoft Office\root\Office16\Library
A quick way to find where your directory is: search on *.xlam in File Manager. Start with the root (c:/) directory. It should locate two add-ins that are installed with Excel. That is the directory to copy the fred.xlam file to.
Step 2 - Open Microsoft Excel
Run Microsoft Excel as you normally would. When Excel opens, you'll be shown the start up screen (unless you opened it by clicking on a spreadsheet file).
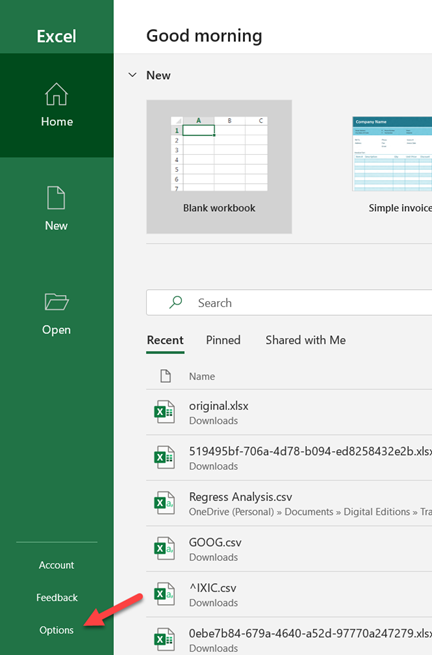
Step 3 - Select Options Menu Item
The Options selection will contain the Add Ins option.
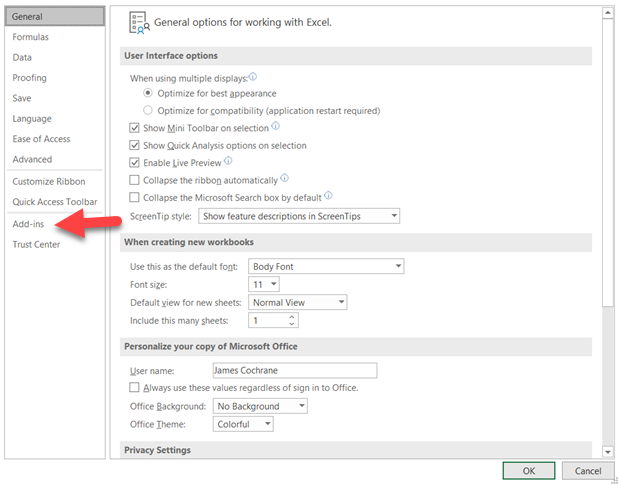
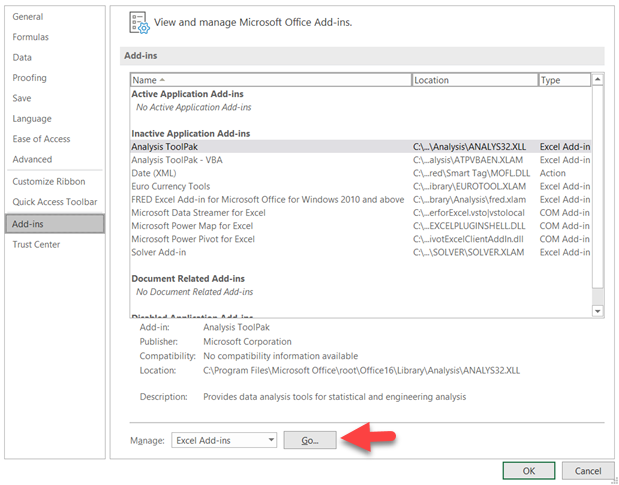
Step 4 - FRED Add In Should be In The List
The FRED Add In should appear in the Inactive Application Add-ins list, since you copied it into the Add-Ins. If you downloaded the fred.xlam and placed it in another folder, Excel won't find it.
Note that the list of Active Application Add-ins (highlighted) may be different for you if you have other Add Ins enabled!
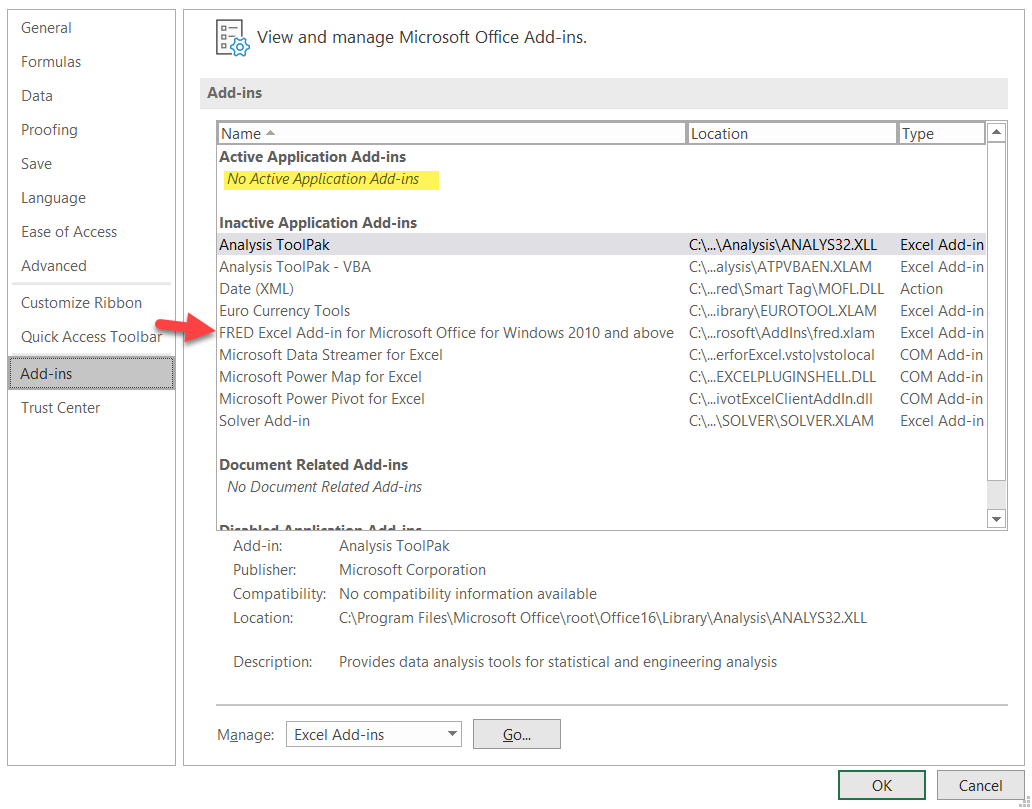
Step 5 - Select Go Button
At the bottom of the Add ins options, select the "Go" Button.
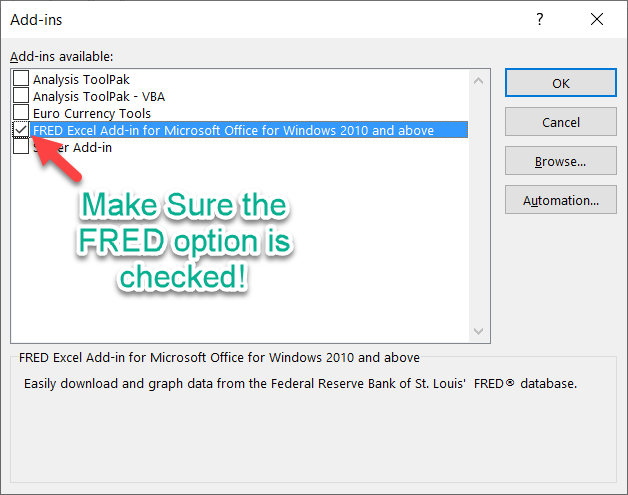
Step 6 - Check the FRED Option and Hit <OK>
A list of Add Ins will appear and FRED should be one of them. Make sure this option is selected. NOTE: Other items may already be selected depending on your configuration (and use).
Step 7 - FRED Should Appear in your Menu
After you hit the OK button from the options, a menu item called "FRED" should appear in your main menu of Excel. Go ahead on click on it.

Step 8 - Start Using FRED
Create a new workbook. Then, following is a short tutorial on the basics of using FRED.
Basics on How to Use FRED
When you start experimenting with using FRED, you'll see it is a vast resource of information. The interface is not difficult, but takes some getting used to.
The database works by using indicators, which are much like stock symbols. These indicators are generated by the Federal Reserve, and they are somewhat cryptic. Therefore, they won't be easy to guess.
Luckily, the Add In has options to help you find the indicators. More on this later.
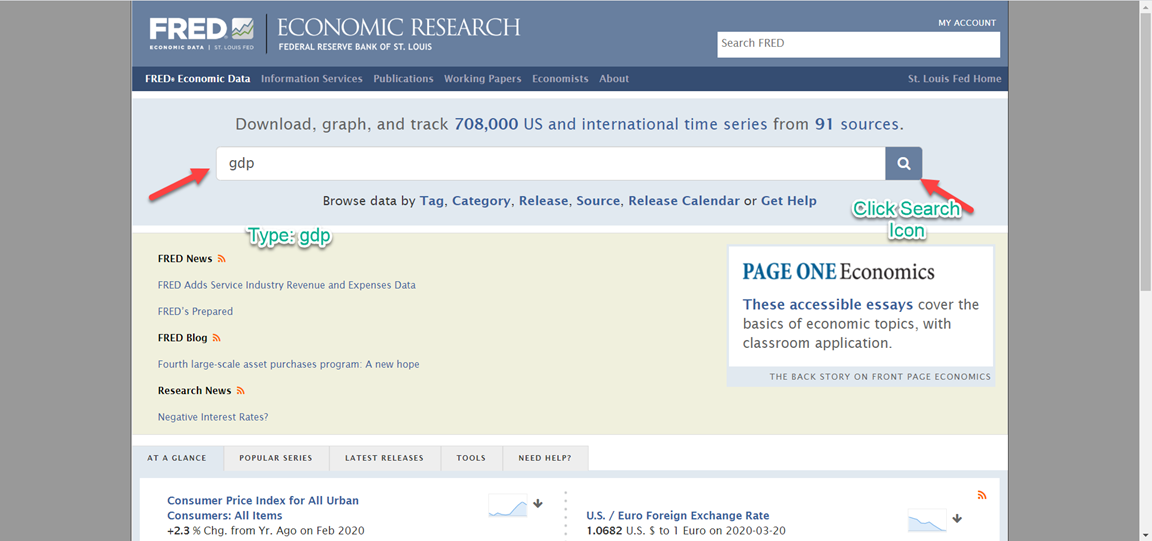
You can use the Federal Reserve website to look up the symbols. The following shows how to find Real GDP.
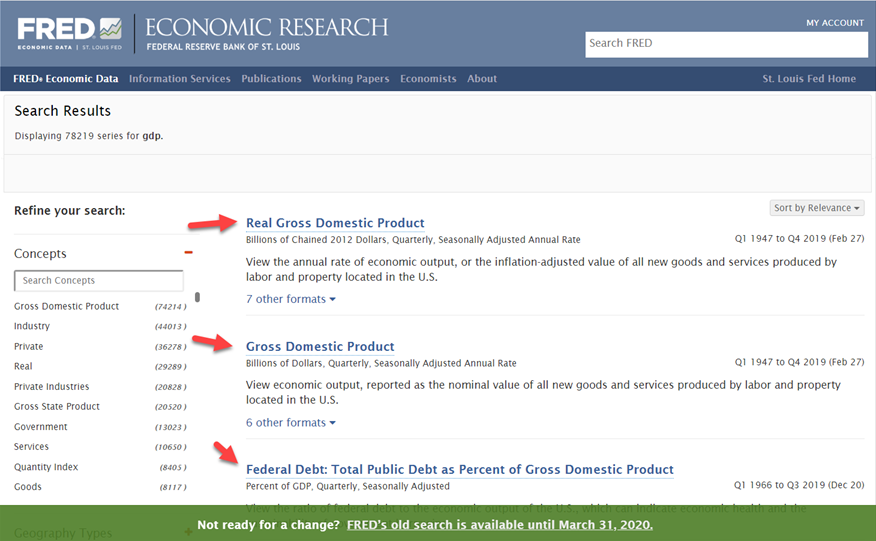
Select the option, "Real Gross Domestic Product" for this example. It should be the first item in the results. The following screen will appear:
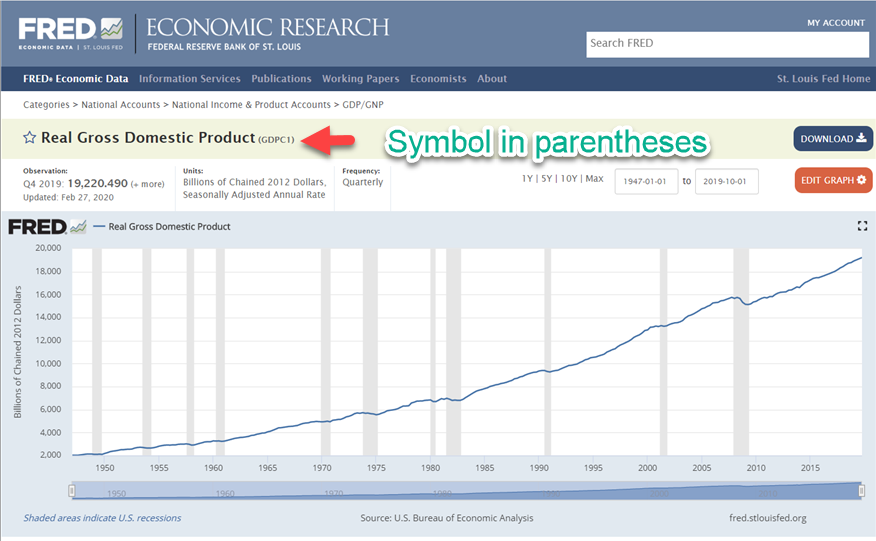
The indicator is the value in the parantheses after the data point. In the above example, the indicator is GDPC1 for Real Gross Domestic Product.
To continue with another data point, let's find Durable Consumer Goods. When searching for that we find the following:
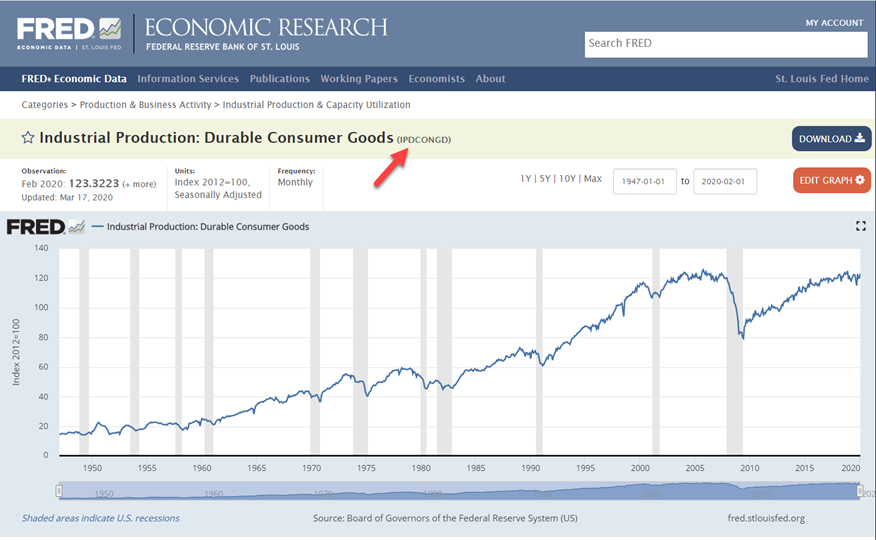
The indicator for this is IPDCONGD.
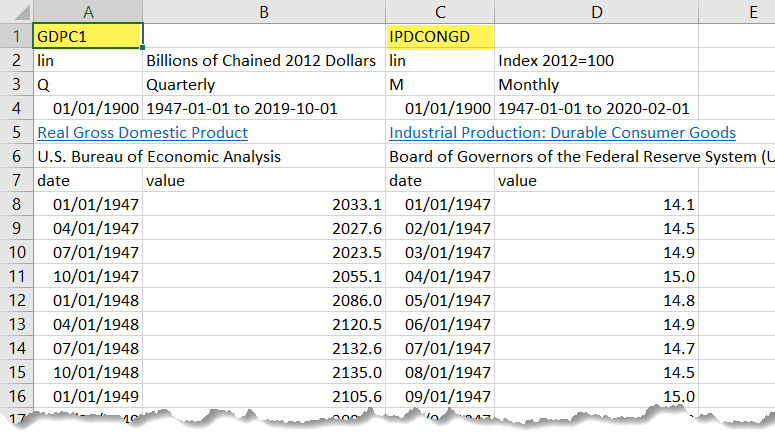
You place the indicators (or let the add in do it for you - again more about that below!) into the first row of your spreadsheet. Each indicator is placed in a subsequent column of that first row. Repeat the process of looking up the appropriate indicator and adding it to the subsequent column of the first row. For the two indicators we looked up so far, the spreadsheet should look like the following:
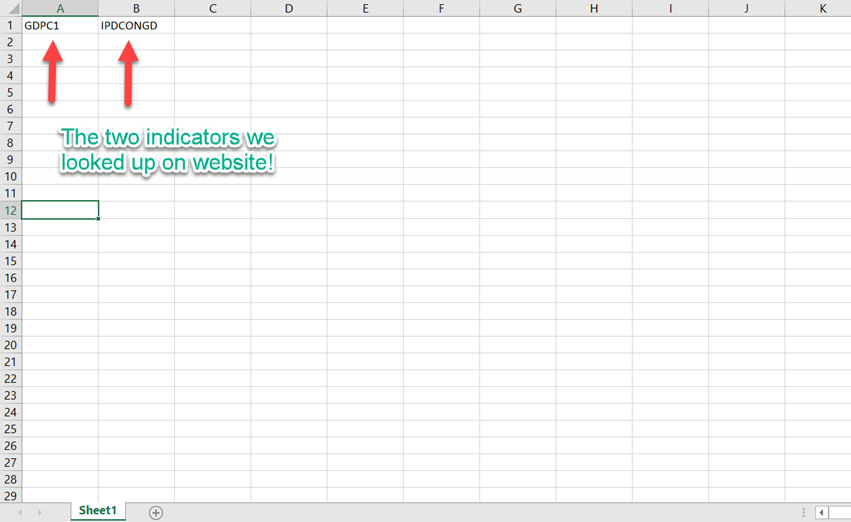
Once you have all the indicators you want to retrieve, select the Get FRED Data.
The FRED database will retrieve the requested information based on the indicators and place them into the appropriate columns.
You'll notice that the add-in will shift columns as needed. In our case, it moved the Durable Consumer Goods column to make room for the extra column for the Real GDP. If you put the spaces in yourself, it will still work! Here are the results:
If you make changes, you can use the Update Data option. For instance, if you change the start date from 01/01/1900 to a later date, clicking on the Update Data option will reflect the new information. This can be useful to align time series data of multiple columns.
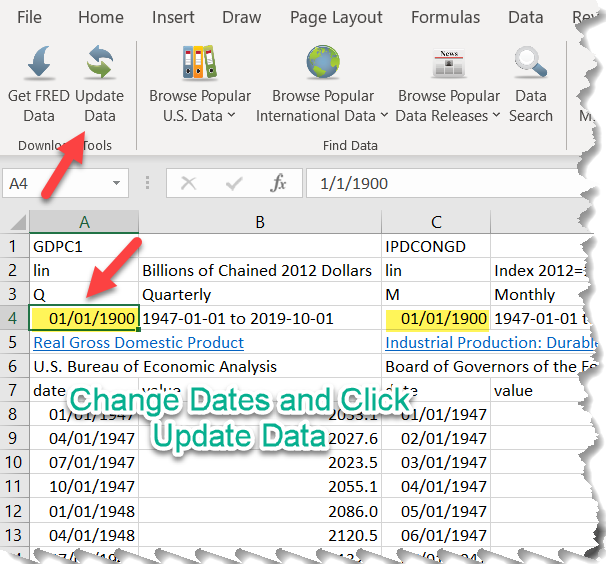
If you change the data and hit Get FRED Data, it will also work. However, if you try to run from the beginning with the Update button first, you'll get an error.
Have the Add-in Do the Work For You
Start with a new worksheet or workbook for this next section.
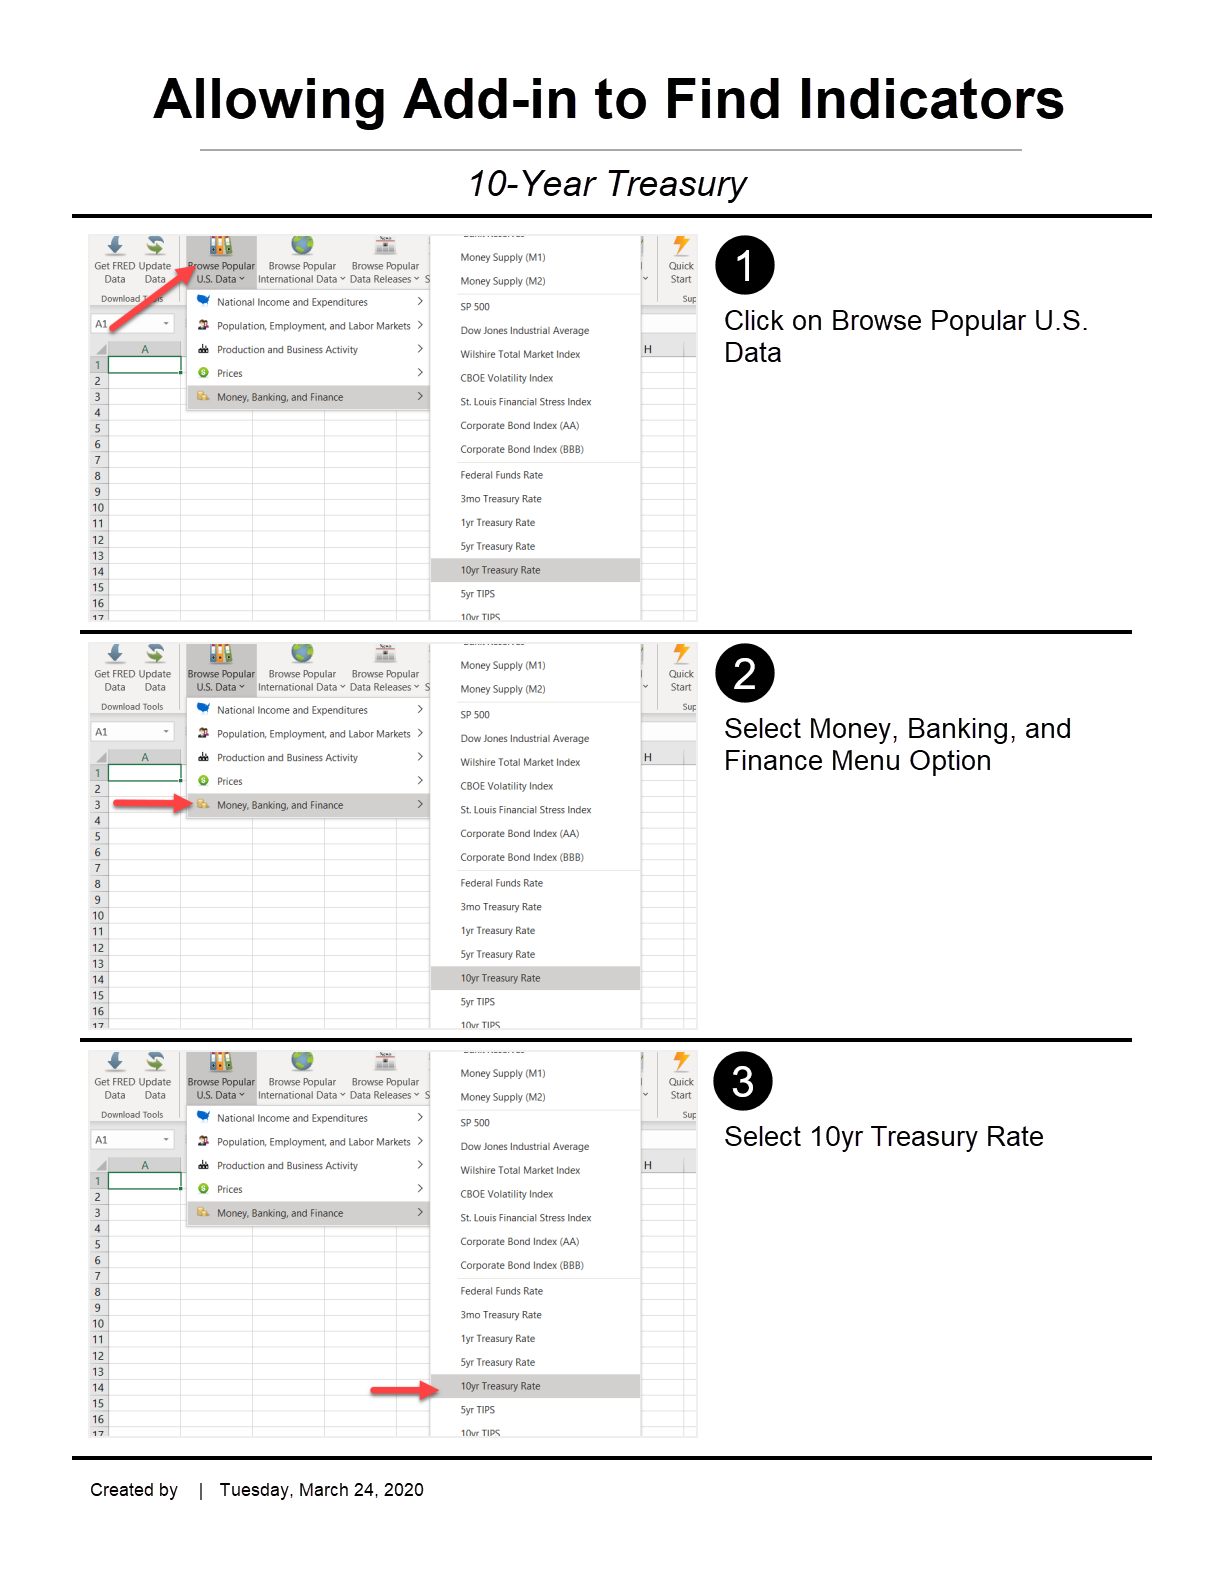
As mentioned, we can have the add-in do the work for us in looking up information and placing it into the appropriate locations on the spreadsheet. For this section, let's choose the 10-Year treasury for the first data point. We'll also have the add-in retrieve the US Dollar index. Use the following for the 10-Year Treasury:
Use the following to obtain the Dollar Index:
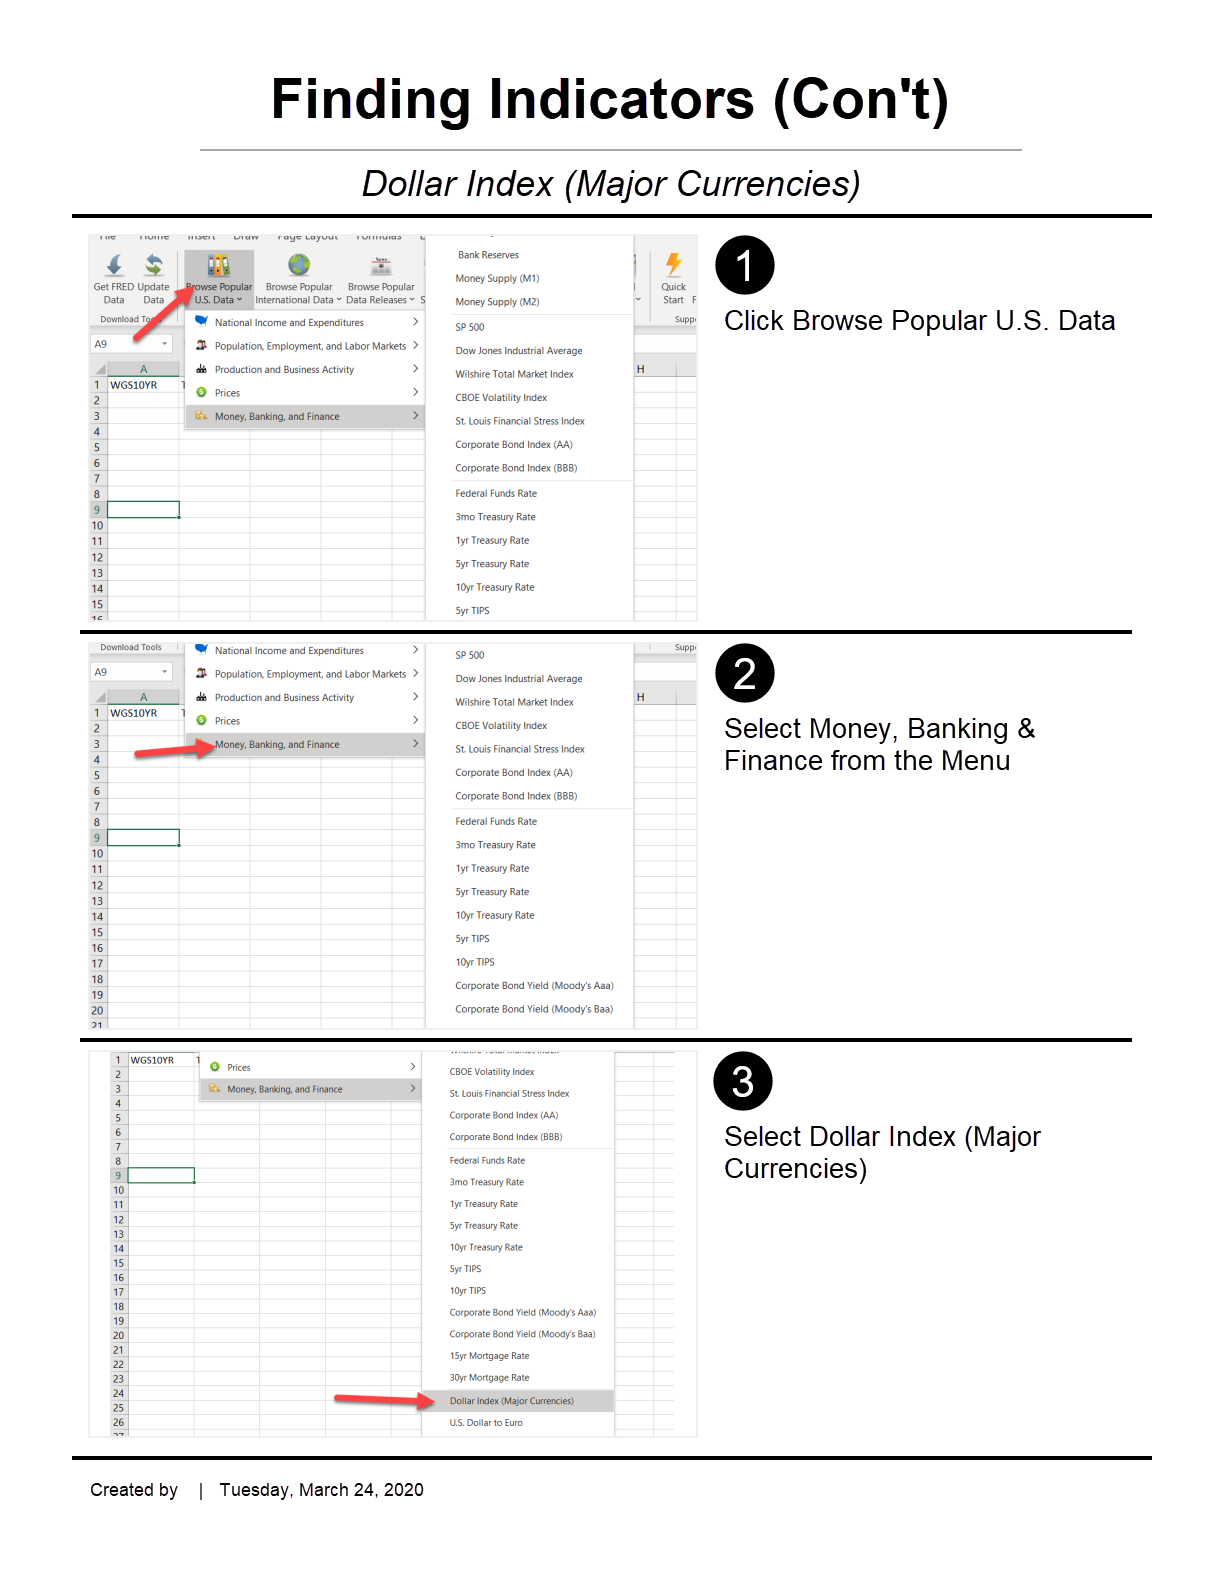
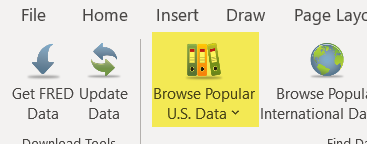
It may be a little difficult to see the button on the screens above. Here is what the button looks like on the menu bar:
After selecting the two indices the spreadsheet should look as follows:
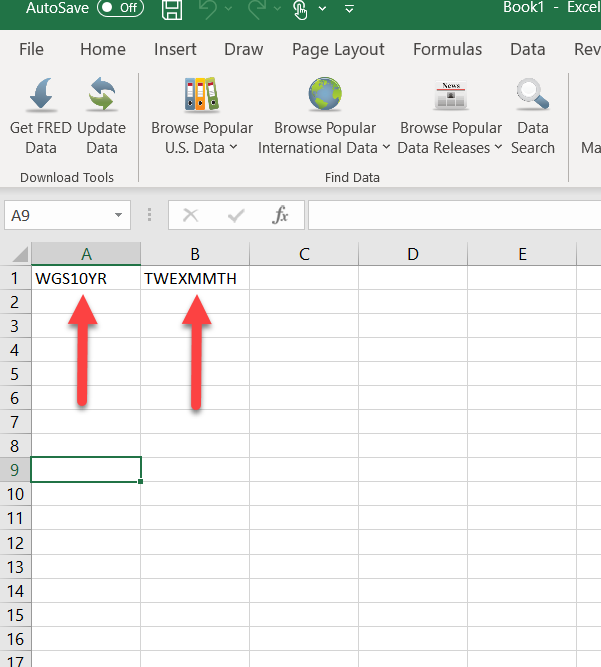
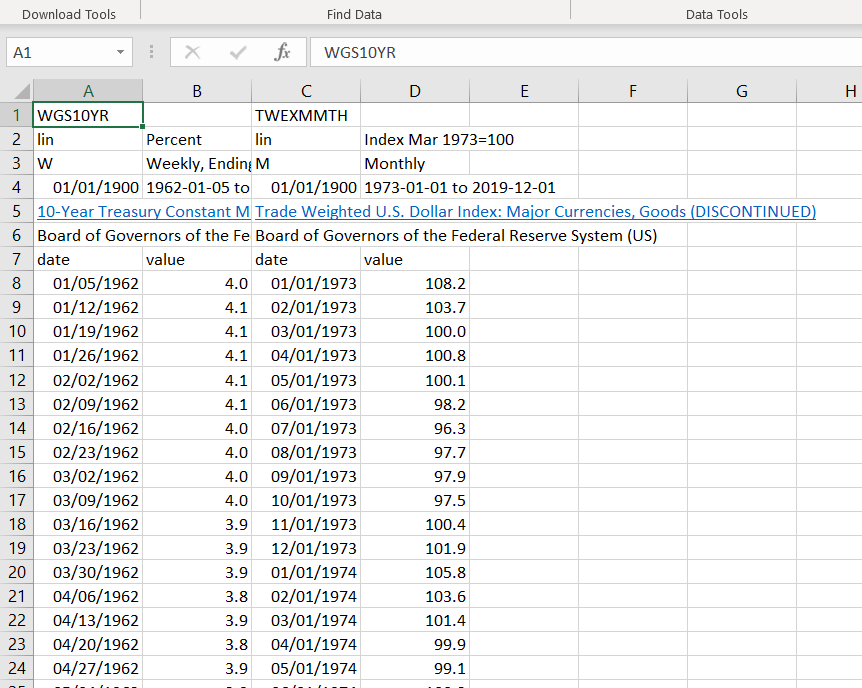
The best aspect of this is it uses human-readable fields and translates them into the proper indices. The next step is to hit the Get FRED Data button.
Conclusion
The Federal Reserve has thousands of indicators available and they can be easily obtained by using the add-in. It's simple to install and gives you a lot of powerful data points for your financial analysis. Feel free to experiment with the add-in to find data points you may be interested in.
Resources
YouTube Tutorial - this tutorial is from 2011, but is still relevant. It covers other features not covered in the above tutorial (why reinvent the wheel?)
Federal Reserve Popular Data Series - the Federal Reserve has a lot of useful articles and tutorials on its website. On this page, you'll see popular data points to consider.
How to Use FRED Data - the Federal Reserve also publishes some information on how to use its data. It's a good place to start.

